


Outside of using Obsidian for daily reflection, my biggest use of Obsidian is as a personal Customer Relationship Management (CRM) system for keeping myself organized in my customer-facing role. I have to keep track of the work I am doing with that client, who I am working with, meeting notes, and entering notes into my company's customer success system.
Using a combination of plugins and CSS snippets, I have created a workflow that works extremely well for me. Your mileage may vary, but you may find a part of this that makes you go "aha!" and integrate it into your own workflow.
General Structure
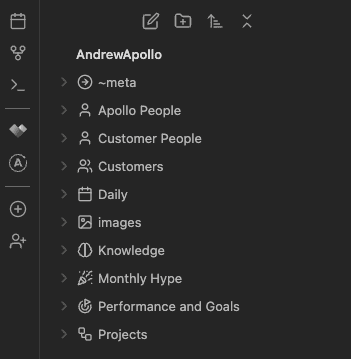
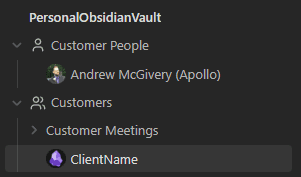
The CRM portion of my vault is generally broken down into the following structure:
/Apollo People
/Customer People
/Customers
    /Customer Meetings
You'll also notice in this screenshot the use of Open Gate for some external sites, Ribbon Divider to separate ribbon icons into groups, Commander to add QuickAdd commands to the ribbon, and Iconize to make the folders visually distinct.
The Center Piece: Customer Page
The most important part of this workflow is my /Customers folder. This folder contains a page for each individual customer
that serves as a dashboard, and a taggable/linkable entity, for use in other notes.
I use a combination of Dataview and Open Gate to populate this page with content from my vault and content from other web-based systems.
I break it down into a few different sections:
- About and Notes - General information about the client
- People - a list of people for that client (more on this later)
- Dashboards - A series of embedded Open Gate instances
- Customer Meetings - List of customer meetings and summaries pulled in via Dataview (more on this later)
- Activity Feed - A list of mentions from across my vault pulled in via Dataview
About and Notes
Generally, I capture things here like the client's goals, relevant links/documents, and a general summary of the current state. Ultimately, this can be whatever you want.
Dashboards
At my company, there is information stored in our Customer Success System, Vitally. I like to include various dashboards and pages from this web app using Open Gate so I have quick access to them.
I also use exclusively dark mode, and to avoid flashbanging myself, I use the css property of the gate to make the site dark mode. Remember
that you can include as many of these embeds as you want, and each one can have its own custom styling to modify/remove/hide elements.
# Dashboard

```gate
https://xxxx.vitally.io/organizations/xxxx-xxxx-xxxx-xxxx-xxxxx
height: 800px
profile: open-gate
css: |
   html { -webkit-filter: invert(90%) hue-rotate(180deg)!important; filter: invert(90%) hue-rotate(180deg)!important; background: rgb(25, 25, 25)!important; }
   img, svg { filter: invert(100%) hue-rotate(180deg) brightness(1.1) contrast(105%)!important; }
```
Activity Feed
Here, I use Dataview to generate a list of mentions from across my vault, pulled in via Dataview. This assumes mentions are within bullets.
TABLE L.text AS "Text"
FROM [[ClientName]]
FLATTEN file.lists as L
WHERE contains(L.text, "[[ClientName]]")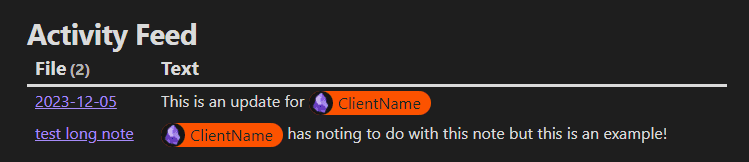
Customer People
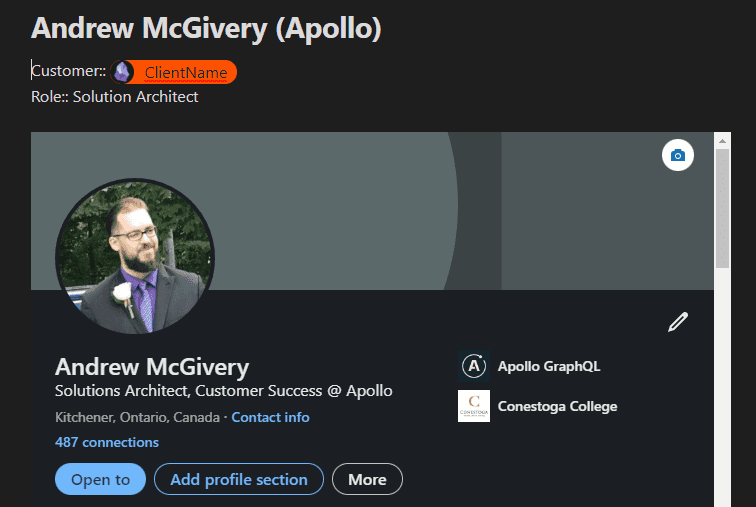
Under my /Customer People folder, I keep a page for each individual person. For example, I may have a page called
Andrew McGivery (Apollo). I have a template that I use when adding a new person that utilizes
Templater to gather some information.
- Customer:: [[<% tp.system.prompt("Enter Customer") %>]]
- Role:: <% tp.system.prompt("Enter Role") %>
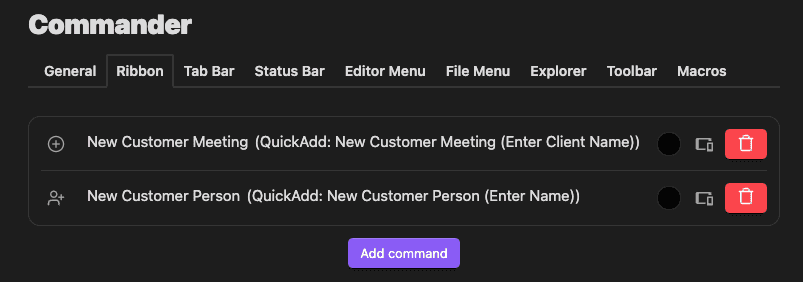
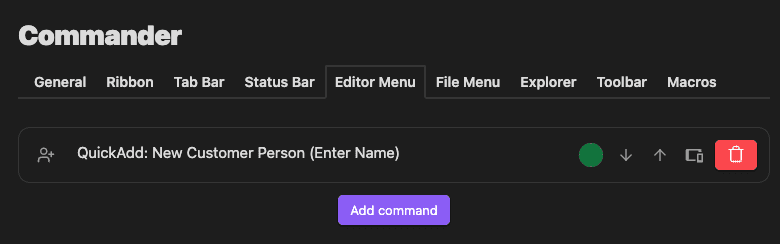
- Notes:: <% tp.system.prompt("Enter Notes") %>When I want to add a new person, I use a QuickAdd command that can be triggered via Commander by clicking on the button in the ribbon or by highlighting text in a note (the person's name), right-clicking, and selecting the command from the context menu.

Back on my Customer page, I can use a Dataview query to list all the customer people for that customer.
# People

```dataview
TABLE WITHOUT ID
file.link AS "Person",
Role,
Notes
FROM "Customer People"
WHERE Customer = link("Customers/MyCustomer")
```
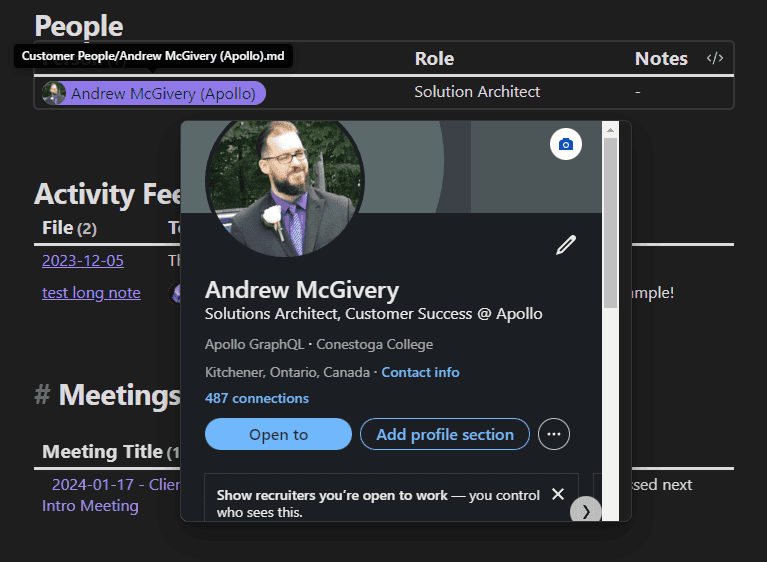
One last touch is I like to include a styled Open Gate of the person's LinkedIn profile so I have it readily available.
```gate
https://www.linkedin.com/in/andrewmcgivery/
height: 1000
css: |
  header { display: none !important; }
  .application-outlet { background-color: #1e1e1e !important; margin-top: -25px; }
  section:has(#content_collections) { display: none; }
  .authentication-outlet { padding-top: 0px !important; }
  .scaffold-layout-container { width: 100%; max-width: 100% !important; }
```
We can take this one step further by adding a CSS class to the note template (e.g., page-clientpeople) and adding a CSS snippet
so that when we get a page preview of the person from hovering a link, we see their LinkedIn profile in the popup:
.popover .page-clientpeople .open-gate-view {
  position: absolute;
  top: 0;
  left: 0;
  right: 0;
  bottom: 0;
}
Customer Meetings
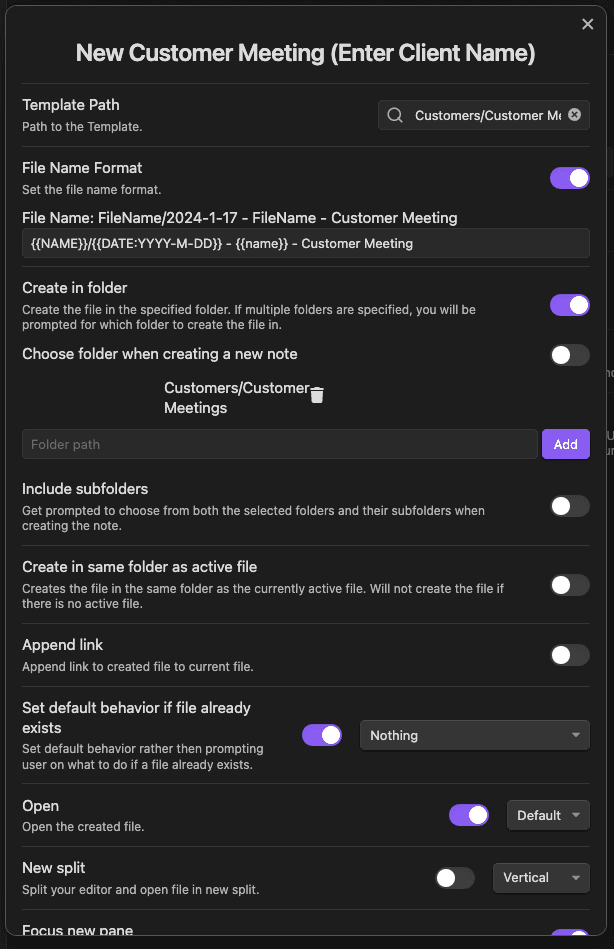
When I have a meeting with a customer, I click the + button in my sidebar (see screenshot under General Structure), which kicks
off a QuickAdd command to create a new page from a template.
- Customer Page Link: [[{{VALUE}}]]

# Summary

Summary:: ...

# Notes

- ...

# Vitally Updates

- …
This allows me to take notes about the meeting as the meeting goes on, and then once the meeting is complete, fill out the Summary and the Vitally Updates that I need to input into our Customer Success system (more on this later).
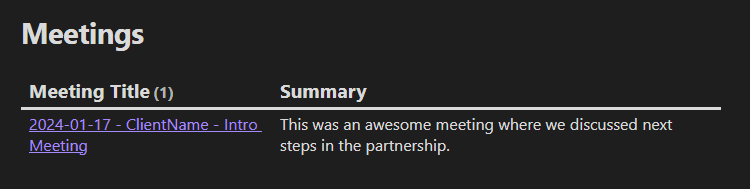
The page is linked back to the client, which allows me to include it in a Dataview query on the client page. This allows me to have an easily accessible listing of all meetings I've had with that client with a summary of each one.
# Meetings

```dataview
TABLE WITHOUT ID
file.link AS "Meeting Title",
Summary
FROM "Customers/Customer Meetings"
WHERE any(file.outlinks, (l) => l = link("Customers/MyCustomer")) = true
```
Daily Notes
In my Daily Note, I have a couple of queries to gather information from the above structure.
Vitally Updates
The Vitally Updates taken in the customer meetings need to be inputted into our Customer Success system so they are accessible by everyone. I have a query on my Daily Note (which I fill out at the end of the day) that uses Dataview to query that day's customer meetings and display the Vitally Updates so I don't forget!
TABLE WITHOUT ID
file.link AS "Client",
map(filter(file.lists, (l) => meta(l.section).subpath = "Vitally Updates"), (l) => l.text) as "Update"
FROM "Customers/Customer Meetings"
WHERE startswith(file.name, this.file.name)
Followups to Explore
Additionally, I have a "Followups to Explore" list. This is a list of client pages that haven't been mentioned in more than 30 days, and therefore, I probably haven't interacted with them. It is just a way to make sure I don't forget about certain clients.
The query filters out clients who have the tag #nofollowup.
TABLE WITHOUT ID
file.link AS "Client",
reverse(sort(file.inlinks))[0] AS "Last Mention",
date(today) - reverse(sort(map(file.inlinks, (l) => date(l))))[0] as "Days since last mention"
FROM "Customers" AND !"Customers/Customer Meetings" AND !#nofollowup
WHERE number(durationformat(date(today) - reverse(sort(map(file.inlinks, (l) => date(l))))[0], "d")) > 30
SORT date(today) - reverse(sort(map(file.inlinks, (l) => date(l))))[0] DESC
Pretty Links
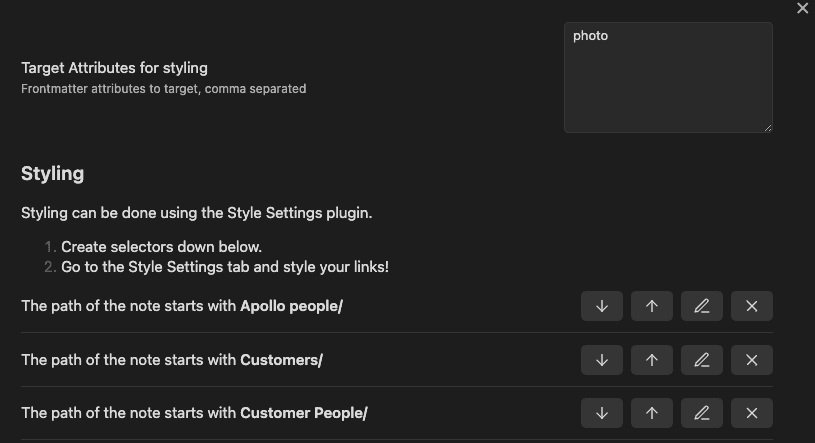
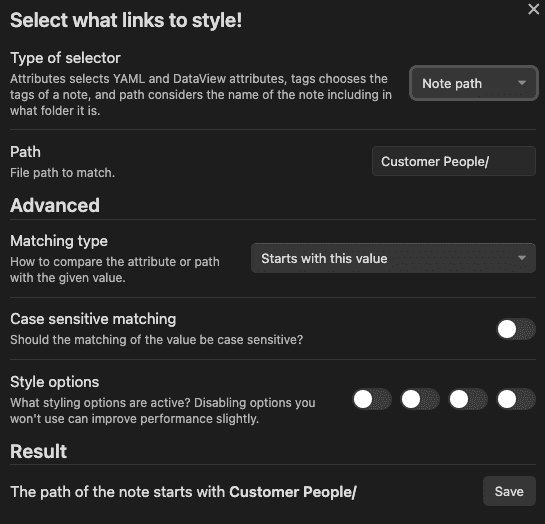
You may have noticed from my screenshots that the page mentions are styled and have a picture/logo next to them. This
is done with a combo of the Supercharged Links plugin, a photo property on pages
(image URL), and some custom CSS snippets.
This results in inline mentions being styled as well as the photo showing up in the file explorer and quick switcher.


/* Customers */

.view-content .data-link-text[data-link-path*="Customers/" i]:not([data-link-path*="Customers/Customer Meetings" i]) {
  background-color: #fc5200;
  color: #15252d;
  vertical-align: middle;
  height: 1.5em;
  display: inline-block;
  padding: 0 10px;
  border-top-right-radius: 1.5em;
  border-bottom-right-radius: 1.5em;
}

.view-content .data-link-text[data-link-path*="Customers/" i]:not([data-link-photo^="https" i]) {
  border-top-left-radius: 1.5em;
  border-bottom-left-radius: 1.5em;
}

.view-content .data-link-text[data-link-path*="Customers/" i].data-link-icon {
  border-top-left-radius: 1.5em;
  border-bottom-left-radius: 1.5em;
  padding-left: 0;
  text-decoration: none;
}

.view-content .data-link-text[data-link-path*="Customers/" i].data-link-icon:not([data-link-photo^="https" i]) {
  padding-left: 10px;
}

.view-content .data-link-text[data-link-path*="Customers/" i] .cm-underline {
  text-decoration: none;
}

.view-content .data-link-icon[data-link-path*="Customers/" i][data-link-photo^="https" i]:empty {
  display: inline-block;
  background-color: #fc5200;
  height: 1.5em;
  width: 1.5em;
  vertical-align: middle;
  border-top-left-radius: 1.5em;
  border-bottom-left-radius: 1.5em;
}

.view-content .data-link-icon[data-link-path*="Customers/" i][data-link-photo^="https" i]:before {
  content: "";
  display: inline-block;
  width: 1.5em;
  height: 1.5em;
  display: inline-block;
  background-image: var(--data-link-photo);
  background-size: cover;
  border-radius: 100%;
}

.data-link-icon[data-link-path*="Customers/" i][data-link-photo^="https" i]:not(:empty):not(
    .workspace-tab-header-inner-title
  )::before {
  content: "";
  width: 1.5em;
  height: 1.5em;
  display: inline-block;
  vertical-align: bottom;
  background-image: var(--data-link-photo);
  background-size: cover;
  border-radius: 100%;
  margin-right: 5px;
}

.data-link-icon[data-link-path*="Customers/" i][data-link-photo^="https" i]:not(:empty):not(
    .workspace-tab-header-inner-title
  ) {
  line-height: 1.5;
}

/* Customer People */
.view-content
  .data-link-text[data-link-path*="Customer People/" i]:not([data-link-path*="Customer People/Customer Meetings" i]) {
  background-color: #8f78e7;
  color: #15252d;
  vertical-align: middle;
  height: 1.5em;
  display: inline-block;
  padding: 0 10px 0 5px;
  border-top-right-radius: 1.5em;
  border-bottom-right-radius: 1.5em;
}

.view-content .data-link-text[data-link-path*="Customer People/" i]:not([data-link-photo^="https" i]) {
  border-top-left-radius: 1.5em;
  border-bottom-left-radius: 1.5em;
  padding-left: 10px;
}

.view-content .data-link-text[data-link-path*="Customer People/" i].data-link-icon {
  border-top-left-radius: 1.5em;
  border-bottom-left-radius: 1.5em;
  padding-left: 0;
  text-decoration: none;
}

.view-content .data-link-text[data-link-path*="Customer People/" i].data-link-icon:not([data-link-photo^="https" i]) {
  padding-left: 10px;
}

.view-content .data-link-text[data-link-path*="Customer People/" i] .cm-underline {
  text-decoration: none;
}

.view-content .data-link-icon[data-link-path*="Customer People/" i][data-link-photo^="https" i]:empty {
  display: inline-block;
  background-color: #8f78e7;
  height: 1.5em;
  width: 1.5em;
  vertical-align: middle;
  border-top-left-radius: 1.5em;
  border-bottom-left-radius: 1.5em;
}

.view-content .data-link-icon[data-link-path*="Customer People/" i][data-link-photo^="https" i]:before {
  content: "";
  display: inline-block;
  width: 1.5em;
  height: 1.5em;
  display: inline-block;
  background-image: var(--data-link-photo);
  background-size: cover;
  border-radius: 100%;
}

.data-link-icon[data-link-path*="Customer People/" i][data-link-photo^="https" i]:not(:empty):not(
    .workspace-tab-header-inner-title
  )::before {
  content: "";
  width: 1.5em;
  height: 1.5em;
  display: inline-block;
  vertical-align: bottom;
  background-image: var(--data-link-photo);
  background-size: cover;
  border-radius: 100%;
  margin-right: 5px;
}

.data-link-icon[data-link-path*="Customer People/" i][data-link-photo^="https" i]:not(:empty):not(
    .workspace-tab-header-inner-title
  ) {
  line-height: 1.5;
}
Conclusion
In summary, with a combo of plugins and styling, you can push Obsidian pretty far and make it into a pretty functional CRM for personal use. You can automate workflows, query data, remind yourself to follow up, and more.
Do you use a similar workflow? Is there something from this workflow that you plan to utilize? Are you feeling inspired? Let us know in the comments below!


